Plone Folderish Content Types And References
This little walk through will illustrate some of the principles for building a folderish content type and for using references. For me there was quite a lot of new things I had to learn in order to understand these concepts. I really try to remain a minimalist and only introduce one new concept at a time with the minimal effort. However, this tutorial introduces at least two new concepts: folderish content types and references. They do not necessarily have to be combined like this - I only do it because it suits my way of wanting to implement this specific family of content types.
Since the documentation of Plone sometimes lags I got the tip to use something called DocFinderTab (see [1] for downloads and so on). The DocFinderTab allows you to see the names of all functions you can use on an object and how to call them. This is similar to SourceDiving but you get a lot for free instead of having to scan through thousands of source code files distributed over at least three platforms.
You can download the product explained in this tutorial here: [2], enjoy.
Goal
I want to create a network where the nodes and edges are content types that all together build up some kind of network. Also I want them to be forced to live inside a special network folder.
Files Used
Still trying to be a frugalist this tutorial includes the usual four files and two skins-files:
__init__.py
config.py
message.py
Extensions/Install.py
skins/mynetwork/networkfolder_view.pt
skins/mynetwork/node_view.pt
Please note the more intelligent approach to installing the different classes using better "factory registration code" in Extensions/Install.py (hint provided by ritz):
def addToFactoryTool(self, out):
     print >> out, 'portal_factory modifications started.'

     ftool = getToolByName(self, 'portal_factory')

     if ftool:
          portal_factory_types = ftool.getFactoryTypes().keys()

     for portalType in [ typeDict['portal_type'] for typeDict in listTypes(PROJECTNAME) ]:
          if portalType not in portal_factory_types:
               portal_factory_types.append(portalType)
               ftool.manage_setPortalFactoryTypes(listOfTypeIds=portal_factory_types)
               print >> out, '    %s now uses portal_factory' % portalType

     print >> out, 'portal_factory modifications done.'
Classes used
I have three classes:
- network folder
- node
- edge
The network folder class
The code in the network folder is quite condensed and contains two methods: one for getting a list of nodes, and one for a list of edges in the folder. This is the code:
class NetworkFolder(BaseFolder):
    "A folder to put nodes and edges in."

    schema = BaseSchema.copy() +  Schema(())
    allowed_content_types = ('node', 'edge')
    filter_content_types = 1
    _at_rename_after_creation = True

    def edges(self):
        "Get edges contained in this folder."
        output = list()

        for item in self.listFolderContents():
            if isinstance(item, edge):
                if item.getNode_a() != None and item.getNode_b() != None:
                    output.append(item)

        output.sort()
        output.reverse()
        return output


    def nodes(self):
        "Get nodes contained in this folder."
        output = list()

        for item in self.listFolderContents():
            if isinstance(item, node):
                output.append(item)

        output.sort()
        output.reverse()
        return output

registerType(NetworkFolder, PROJECTNAME)
These two lines are of particular interest:
    allowed_content_types = ('node', 'edge')
    filter_content_types = 1
The first one says: "if we filter the content then only allow nodes and edges" and the second one says"filter the contents". This results in "only allow nodes and edges" :)
This is what it looks like when you add a network folder:
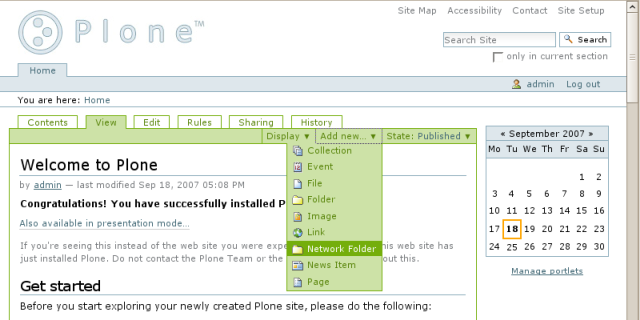
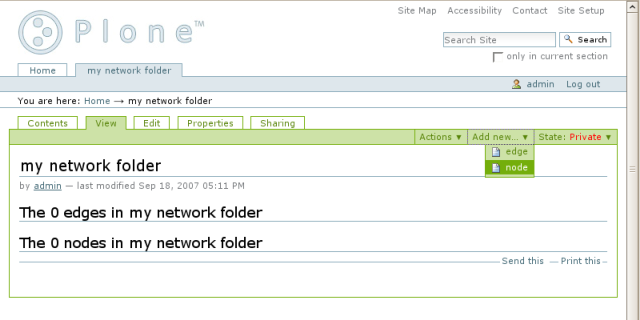
And inside the folder we can now only add nodes and edges:
The node class
The code for the node is almost as minimal as you can make a content type I guess:
class node(BaseContent):
    """An Archetype for nodes (only allowed in a network folder)"""
    schema = BaseSchema.copy() + Schema(())
    _at_rename_after_creation = True
    global_allow = 0

registerType(node, PROJECTNAME)
Of particular interest here is the line containing global_allow = 0 - this line informs the system to not allow nodes to be placed anywhere. This is matched with code in the network folder to allow nodes in there.
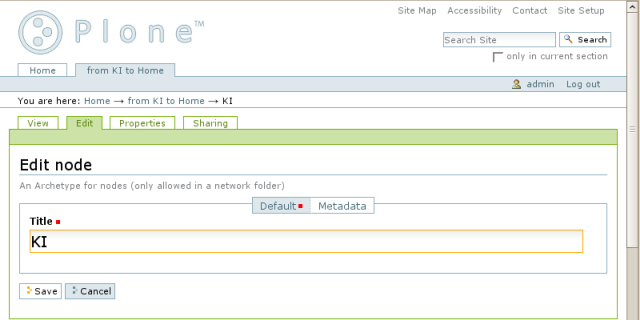
Adding a node is simple: just insert a title:
The edge class
It is the edge class where all the action takes place. In short an edge is a content type with two reference fields (see for example [3] for some hints on the reference field and also [4] for hints on the reference browser widget).
As you will see the principal layout of the edge is two sets of nodes, node_a and node_b (very original names). For this class I use the reference browser widget in order to get a convenient "popup" when selecting the nodes a and b. In short the syntax is something like this:
ReferenceField('node_a', widget=ReferenceBrowserWidget(... ), ... ),
All the code for the entire class:
class edge(BaseContent):
    """An Archetype for edges"""

    # Schema definition
    schema = BaseSchema.copy() + Schema((

        ReferenceField('node_a',
                       widget=ReferenceBrowserWidget(
                           label="start node",
                           destination=".",
                           destination_types=("node",),
                           ),
                       required = 1,
                       relationship='start',
                       allowed_types= ("node",),
                       ),

        ReferenceField('node_b',
                       widget=ReferenceBrowserWidget(
                           label="end node",
                           destination=".",
                           destination_types=("node",),
                           ),
                       required = 1,
                       relationship='end',
                       allowed_types= ("node",),
                       ),
        ))

    global_allow = 0
    _at_rename_after_creation = True

registerType(edge, PROJECTNAME)
This is what it looks like when you edit or create an edge:
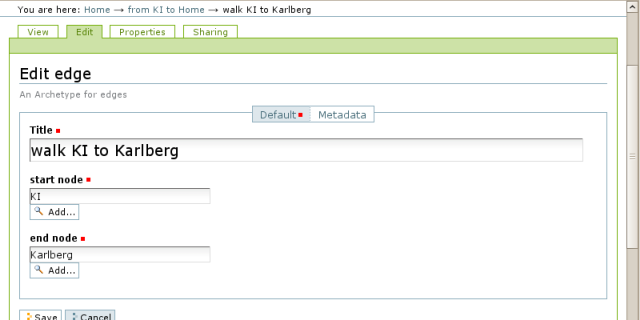
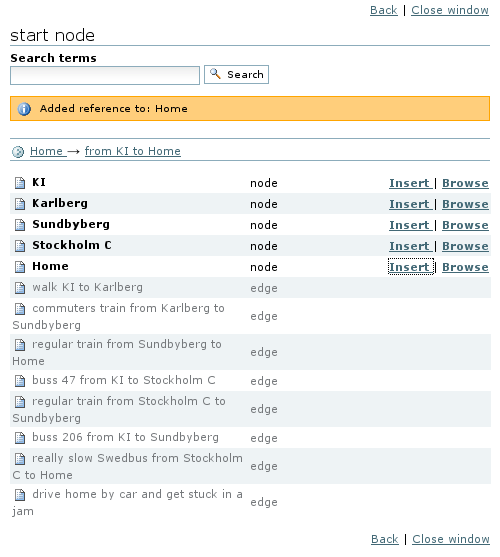
And this is the reference browser widget in action:
Just add page templates
If you haven't looked into zopes TAL and METAL languages this is a great opportunity to do so (one of many guides on the web is this one: [5] it's quite short, simple and explains one thing at a time, also this one seems nice: [6] ).
node view page template
As you might have guessed if you have read Plone Archetypes View Template Modifications I will not modify more macros than I must. In the node case this is only the body-macro. So the body-macro part of node_view.pt is the following:
<metal:body_macro metal:define-macro="body">

  <b><span tal:replace="context/Title">name</span></b> is a part of:
  <ul>
    <metal tal:repeat="edge context/getBRefs">
      <li><a tal:attributes="href python:edge.reference_url()"
             tal:content="python:edge.Title()"
             >
          edge</a></li>
    </metal>
  </ul>

</metal:body_macro>
I find these files a bit hard to understand since the lines are often quite long. This is also a bad example for you if this is the first time you read a pt-file; it uses tal:replace, tal:content, tal:attributes and tal:repeat. Also it mixes the "python:"-syntax and the "context/"-syntax.
In live example the above code is be interpreted into:
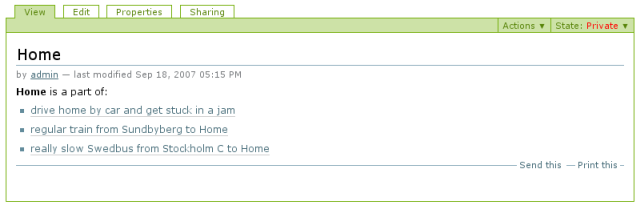
<b>Home</b> is a part of:
<ul>
  <metal>
    <li><a href="[long url]">drive home by car and get stuck in a jam</a></li>
  </metal>
  <metal>
     <li><a href="[long url]">regular train from Sundbyberg to Home</a></li>
  </metal>
  <metal>
    <li><a href="[long url]">really slow Swedbus from Stockholm C to Home</a></li>
  </metal>
</ul>
So this is what happens:
- tal:replace: for example """<span tal:replace="context/Title"> name</span>""" is converted to "Home". As you can see the span-tag is completely replaced (remember: we used tal:replace, so this might not come as a surprise) with the Title of the current object (the context).
- tal:content: like in """<a [...] tal:content="python:edge.Title()"> edge </a>"" is transformed into """<a href="[long url]">regular train from Sundbyberg to Home</a>""". It might not be a complete surprise that content-means the stuff inside the starting and finishing tags.
- tal:attributes: is a simi-colon separated listing of attributes you want. If you only need one as in """<a tal:attributes="href python:edge.reference_url()" [...]>""" there is no need for a semicolon. In this case the html becomes """<a href="[long url]">""".
- tal:repeat creates a loop and defines a variable that is (most likely) different in each iteration. So """<metal tal:repeat="edge context/getBRefs">""" loops over the list created by "context/getBRefs" and in each iteration the variable edge is used. This does not generate any code in itself - but aids in the generation of lists for example - as in the example above.
As you might have already guessed "context/getBRefs" is important here. As you saw above in the edge schema we had reference fields. Also these reference fields "points" to nodes. You might think that nodes then have no idea if they are pointed to or not - but they do. The object is aware of its "back references". To get the back references of an item you can call the function getBRefs (there is also a synonym of this function called something like getBackReferences).
By now I hope you have figured out what we are doing by this code. By using the back references we get a list of the edges a particular node is part of. So when viewing a node you should now see something like this:
network folder view page template
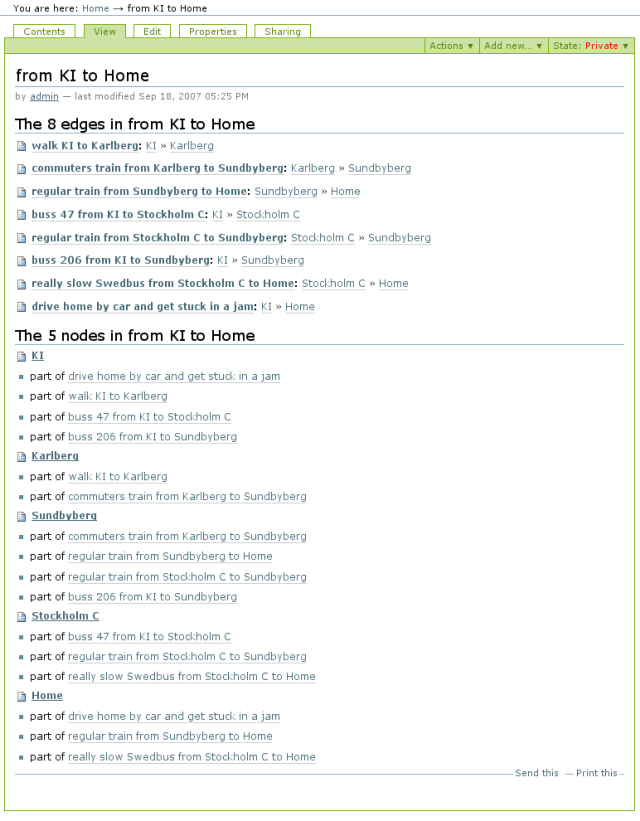
In the network folder view I want to replace the folder listing macro with a custom view of the folder. I first want to see all edges including their start and finish node. Then I want to see all nodes and all edges each node is part of. Also I want lots and lots of links.
This is about half of the file networkfolder_view.pt:
<metal:folderlisting_macro metal:define-macro="folderlisting">
<h2>
The <span tal:content="python:len(context.edges())">42</span> edges
in <span tal:content="context/title"></span>
</h2>
<metal tal:repeat="edge python:context.edges()">
<p>
<img tal:attributes="src edge/getIcon" />
<b><a tal:attributes="href python:edge.reference_url()"
tal:content="python:edge.Title()"
>edge</a>:</b>
<a tal:attributes="href python:edge.getNode_a().reference_url()"
tal:content="python:edge.getNode_a().Title()"
>start</a>
»
<a tal:attributes="href python:edge.getNode_b().reference_url()"
tal:content="python:edge.getNode_b().Title()"
>target</a>
</p>
</metal>
<!-- MORE HERE -->
</metal:folderlisting_macro>
One thing that I have found to be confusing is the mix of python code (like """<span tal:content="python:len(context.edges())">42</span>""") and tal/tales/metal code (like """<span tal:content="context/title"></span>""") in the same file. This is just something you have to live with. I guess it is preferable to avoid python code if possible since it is easier to brake things with python - but sometimes that is impossible.
Code that might be new here is for example:
- <img tal:attributes="src edge/getIcon" />: a nice way to get and display the icon of a content type.
- <a tal:attributes="href python:edge.getNode_a().reference_url()" [...]>: this is used inside a loop where the loop variable is called edge to get the node a of the edge and then to get the url to that node. Nice for creating the links I want.
Viewing the folder should now look something like this:
Final remarks
There are more things you can do with folderish content types, the reference field, the reference browser widget and references. I hope this frugalist approach is complete but not bloated.
Download
Download here: [7]
See also Plone Cms
This page belongs in Kategori Programmering