Plone Export And Document Tools
You can download the source code of this tutorial here: [1]
I saw in CMFBibliography (see [2]) the convenient export and upload buttons next to the other document actions. What I really wanted to dig into was the marshaling (or serialization) of an item but I took a little detour along that line.
This little tutorial is based on Plone Folderish Content Types And References and adds an export button for network folders.
There are apparently more than one way to do this:
- The old way includes modifications of the Extensions/Install.py file. Pretty much hack into an API and we are up and running. This is quite convient - but will probably be disabled in future versions of Plone (as of Plone 3.0 it works). I have commented this version in my code just to illustrate how it works.
- The new way enforces two new folders, three new files, two new syntaxes and disables the possibility to uninstall. This might sound like a drawback but it appears that Zope and Plone are moving more and more towards xml (and zcml - the zope markup language or something like that). And if Zope and Plone moves towards it it cannot be all bad - even though I thought so at first (and still do a bit).
In this tutorial I will also use non-safe python code for use in exporting code. But I am not sure that is best practice - but it works.
Overview of the files
First we have the files that were included in Plone Folderish Content Types And References - of these I will only touch Extensions/Install.py to let the platform know of the new files.
__init__.py
config.py
message.py
Extensions/Install.py
skins/mynetwork/networkfolder_view.pt
skins/mynetwork/node_view.pt
Then there are three more files that deal with the export of the network folder. These three files could be reduced to one file I assume - I will briefly mention how below.
skins/mynetwork/export_crap.pt
skins/mynetwork/export_network_folder.py
skins/mynetwork/export_network_folder_graphviz.py
The last addition are three xml-files (zcml is also xml). These three are required to replace the 20 lines of code or so we could use in the old approach (that will most likely disappear in future Zope and/or Plone versions). The only real content here is in the file profiles/default/actions.xml - the first two are boiler plate coded (see [3])
configure.zcml
profiles.zcml
profiles/default/actions.xml
About Portal Actions
As you may have seen there are two buttons at the bottom of each item in Plone: "Send this" and "Print this". We will here add one more called "Export this network".
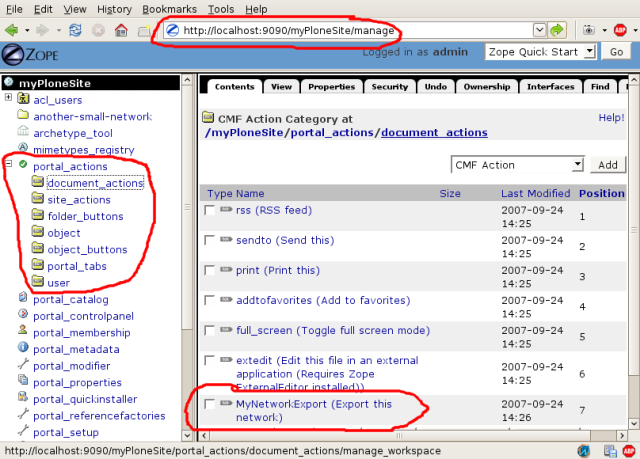
As you know Plone is built upon Zope and many if not most of the changes to your portal can be done in the Zope management interface - typically you just add manage after your url to log into it. In it you can find portal actions -> document actions. In my version of Zope (version 2.10.4) the below screenshot is what it looks like. As you can see I have circled the url - just add manage to your site and you should be able to log in here. I also circled the portal actions and the document action we will create in this little tutorial.
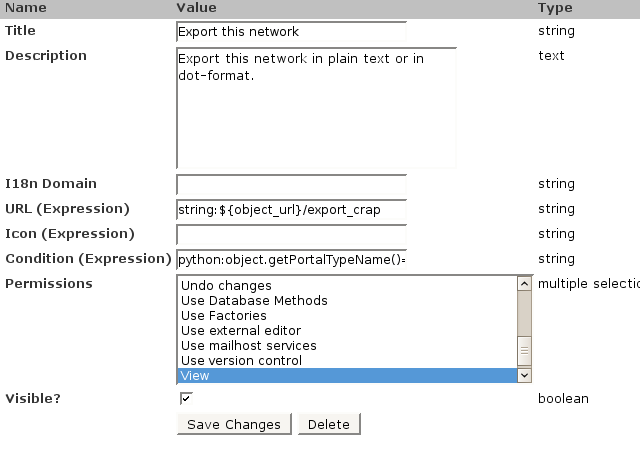
This is the action we will create explained through this interface. If you want you could create through this interface - but for an add on product that is not at all a flexible solution. As we will this can also be expressed in xml (and if you scan the commented code you will see that it can also be done programmatically).
The strange XML-files
In this product there are three xml-files among the files. Let's take a look at them one at a time.
In configure.zcml we pretty much only import profiles.zcml - this is the principal contents of configure.zcml:
<configure [...]>
  <include file="profiles.zcml" />
</configure>
Not much excitement there - I would still recommend using these files as they are since that seems to be current best practice.
The purpose of profiles.zcml seems to be to provide a handle for the real action that will be stored in the last file. This is a short version of the contents in profiles.zcml:
<configure [...]>
  <genericsetup:registerProfile
      name="default"
      title="MyNetwork"
      directory="profiles/default"
      description="Extension profile for my network."
      provides="Products.GenericSetup.interfaces.EXTENSION"
      />
</configure>
So far we've only seen one file that imports a second and the second provides a handle to a third - so this is where the action must take place, right? Let's take a look at profiles/default/actions.xml:
<?xml version="1.0"?>
<object name="portal_actions">
 <action-provider name="portal_actions" />
 <object name="document_actions">
  <object name="MyNetworkExport" meta_type="CMF Action">
   <property name="title">Export this network</property>
   <property name="description">Export this network in plain text or in dot-format.</property>
   <property name="url_expr">string:${object_url}/export_crap</property>
   <property name="available_expr">python:object.getPortalTypeName()=='NetworkFolder'</property>
   <property name="permissions"><element value="View"/></property>
   <property name="visible">True</property>
  </object>
 </object>
</object>
The contents of this file is pretty much the same as displayed on the screen shot above - it's just that this is stored in xml instead. The important things to note here are the following:
- It says something about an url and then this code is in there: "string:${object_url}/export_crap". This means that when we press out new button we will go visit this url. Note that we will also introduce a file called *export_crap* - that file and this line are of course connected.
- In the xml file the phrase "available_expr" is used and in the screen shot the phrase "Condition (Expression)" for the same thing. This expression is a short python code snippet: "python:object.getPortalTypeName()=='NetworkFolder'". This means that only items with the type name NetworkFolder will display the button we are now creating.
- Also we are allowed to use this feature when we have "View"-permission of the content type, this is probably to most sloppy restriction and exactly what we want in this case.
Important note on creating XML-files: Do not try to create these XML-files by hand - you will only end up banging your head against a wall or roll over screaming in front of busses. Instead steal other peoples code or use the Zope management interface to export a profile and the diff it with your previous profile to extract the xml you want. This is, however, also a major headache generator since the diff you will look at will contain hundreds of lines of arbitrary non-significant changes that you will have to remove by hand. If you know of a better way to generate this kind of xml: please press the Kommentera/Comment button at the bottom of this page and let me know how.
Inserting the new document action upon install of your add on product
The file Extenstions/Install.py will of course need some changes in order for these xml-files to be felt and imported when installing. This is a snipped of the relevant new code:
def install(self):
    # ...

    tool = getToolByName(self, 'portal_setup')
    tool.runAllImportStepsFromProfile("profile-Products.%s:default" % PROJECTNA
ME, purge_old=False)

    # ....
As you can see here and in the rest of the source code there is no way of removing this portal action with the uninstaller.
The exporting
As I said above there is no real need for three more files to be created. But I felt a need to explore the possibility of exporting the same content type into different formats so I created a simple form-page to act as a branch. I gave this branch page the exceptionally bad name skins/mynetwork/export_crap.pt.
If you do not want to use more than one file you can link the button to the export script directly - either by renaming the export*.py-files or by modifying the xml-file.
export_crap.pt
The principal contents of export_crap.pt is:
[...]
<h1>Do you really want to export
   <span tal:replace="context/Title">the title</span>?
</h1>

<form tal:attributes="action
  string:${here/absolute_url}/export_network_folder">
  <input class="context" type="submit"
    name="submit" value="Export" />
</form>

<form tal:attributes="action
  string:${here/absolute_url}/export_network_folder_graphviz">
  <input class="context" type="submit"
     name="submit" value="Export (graphviz)" />
</form>
[...]
This results in a page looking a little something like this:
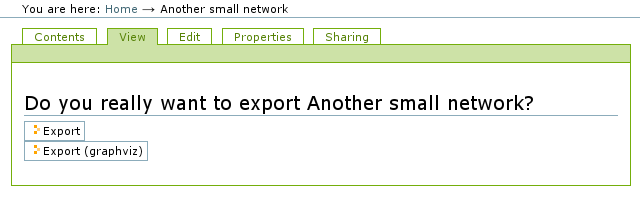
As you can see this is a not really pretty page with two forms - each with one button that send the user to one of these url's:
- ${here/absolute_url}/export_network_folder
- ${here/absolute_url}/export_network_folder_graphviz
These two locations correspond to the second and third file in this product package: export_network_folder_graphviz.py and export_network_folder.py. Let's take a look at the simpler one of them, export_network_folder.py.
export_network_folder.py
This file is located in a skins folder and can therefore be used by pretty much any thing and any one. Also it can rewritten using the Zope management interface. As such this file is less trusted than other code that can not as easily be modified (not to mention that it can be modified in real time without need to restart your Plone instance or reinstall your product). As a result this code is less trusted and is may only do friendly things. You may not use the work "type", there are many packages you may not touch and you may not use private or protected members or functions (meaning stuff called something with an underscore in the beginning). Also this code is slower than other code.
With that said, let's look at the code:
First there are some strange comments. These pretty much import the environment we are it at present. In particular the context (the current object) is imported as "context".
## Script (Python) "bibliography_export"
##bind container=container
##bind context=context
##bind namespace=
##bind script=script
##bind subpath=traverse_subpath
##parameters=format='BibTex', output_encoding=None, eol_style=False
##title=
##
Since we want to export an item we start by setting an appropriate header to the response:
request = container.REQUEST
RESPONSE =  request.RESPONSE

RESPONSE.setHeader('Content-Type', 'application/octet-stream')
RESPONSE.setHeader('Content-Disposition',
                   'attachment; filename=%s' %\
                   context.getId() + '.' + context.getPortalTypeName())
Please note that the filename will be long and ugly and end with something like ".NetworkFolder" - feel free to change "context.getPortalTypeName()" into "txt" to get the files interpreted as text files.
Next I create the output and return it - this is what is to be the contents of the file.
output = ""

for field in context.Schema().filterFields(isMetadata=1):
    content = field.getAccessor(context)()
    if content:
        output += '# %s: %s;\n' % (field.getName(), content)

for node in context.nodes():
    if content:
        output += 'node: %s;\n' % (node.Title())

for edge in context.edges():
    if content:
        output += '%s: %s -> %s;\n' % (
            edge.getId(),
            edge.getNode_a().Title(),
            edge.getNode_b().Title()
            )

return output
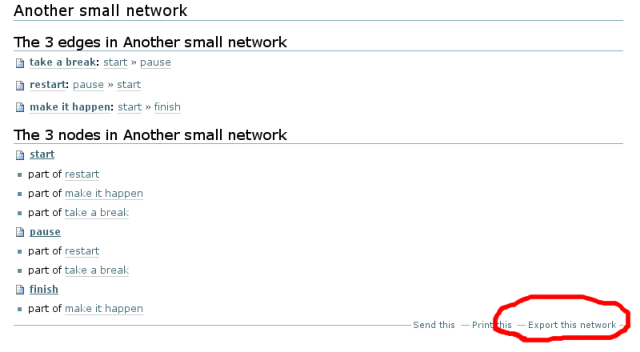
This download format converts the network folder into something like this:
# creators: ('admin',);
# effectiveDate: 2007/09/24 15:15:48.650 GMT+2;
# creation_date: 2007/09/24 14:26:40.615 GMT+2;
# modification_date: 2007/09/24 15:15:48.812 GMT+2;
node: start;
node: pause;
node: finish;
take-a-break: start -> pause;
restart: pause -> start;
make-it-happen: start -> finish;
And that is it - now you should be able to export items in your favorite format. I am a big fan of graphviz (see [4]) so I wanted to export my network in their dot-format so that is the second export of this package - you can see how I did that it in the source code available for download below.
Download here: [5]
See also Plone Cms.
This page belongs in Kategori Programmering.