Django Simple App
Summary
This little tutorial demonstrates how to hook django, a database and web-pages together: we will see views, templates, models, and how they interact.
You can download the entire source including a database here: [1]
The project will contain the following files once completed:
__init__.py
database.dat
manage.py
settings.py
urls.py

simple_chat/__init__.py
simple_chat/forms.py
simple_chat/models.py
simple_chat/urls.py
simple_chat/views.py

templates/simple_chat/index.html
templates/simple_chat/reply.html
If you have not already taken a look at Django First Contact please do so before moving on with this little tutorial.
Django from svn, WTF!?!
Django is going under some major reorganization at the moment. From latest stable version, 0.96, to the svn pre 0.97 version currently available some of django's forms are being reworked. Details on how that will happen is described in the documentation on newforms at the django project home page: [2]
It is perhaps quite straight forward - but in order for this tutorial to be forward compatible I am going to do an svn checkout of django. Personally I hate being bleeding edge but in this case I'll do an exception.
Check out right into python
Official installation instructions available here: [3]
If you followed the Django First Contact tutorial you need to uninstall python-django:
sudo apt-get remove python-django
In order for python to find the django package you need to check it out into the python site-packages - that feels rather uncomfortable but it worked for me. In order for your system to find the django-admin.py-file it is nice to make a soft-link to it as well:
cd /usr/lib/python2.5/site-packages
sudo svn co http://code.djangoproject.com/svn/django/trunk/django/
ln -s django/bin/django-admin.py /usr/local/bin
New project and a new app
To create the project bletch with the app simple_chat just run django-admin with the arguments startproject and startapp:
django-admin.py startproject bletch
cd bletch/
django-admin.py startapp simple_chat
Now you should have the following files and folders:
bletch/
bletch/__init__.py
bletch/manage.py
bletch/settings.py
bletch/urls.py
bletch/simple_chat/
bletch/simple_chat/__init__.py
bletch/simple_chat/models.py
bletch/simple_chat/views.py
Let's make a really simple messaging system
First we want urls like '/chat/' going into our little messaging so we need to redirect them in there.
So we first need to update bletch/urls.py to link into the urls of simple_chat. We will also need take care of these urls in the app simple_chat.
The urlpatterns of bletch/urls.py:
urlpatterns = patterns("",
    (r"^admin/", include("django.contrib.admin.urls")),
    (r"^chat/", include("bletch.simple_chat.urls")),
)
In the simple chat we will have two pages or views: one for reading old messages and one for posting new ones. The urlpatterns of bletch/simple_chat/urls.py is turned into something like this:
urlpatterns = patterns("bletch.simple_chat.views",
    (r"^$", "index"),
    (r"^reply/$", "reply"),
)
The data model for the messages
In models.py we create the model for the messages:
from django.db import models

class SimpleMessage(models.Model):

    sender = models.CharField(
        max_length=50,
        )

    message = models.TextField()

    date = models.DateTimeField(null = True)

    class Admin:
        pass
The strange Admin class that seems totally out of place is a magic class that make the messages show up in the admin interface. Easy to forget - but you miss it if you do :)
A form for posting replys
We want a form where it is possible to write who you are and your message - just like the data model. But we want to hide the time for now.
The django modelforms provide just what we need:
from django import newforms as forms
from models import SimpleMessage
from datetime import datetime

class MessageForm(forms.ModelForm):

    class Meta:
        model = SimpleMessage
        fields = ('sender', 'message')
That could be it really, but we want the date on the message to be set when saving it in the database. So we need to override the save method. Overriding different methods in django is easy but often confusing. So you do not want to do this too often. This snipped shows that performing save on a modelform returns the model it represents:
    def save(self):
        message = super(MessageForm, self).save()
        message.date = datetime.now()
        message.save()

        return message
The index view and templates
In bletch/settings.py we can let django know we are using templates, in the TEMPLATE_DIRS-parameter:
TEMPLATE_DIRS = (
    '/home/per/bletch/templates/'
)
The extremely simple index-view can now be coded. Note that in this snippet we connect all local variables (locals()) and a template. The result is returned and can be seen in the screen shot below. It is quite common but sometimes not so good to send in all local variables to the template, note that the request variable is also sent in.
def index(request):
    messages = SimpleMessage.objects.all()
    return render_to_response('simple_chat/index.html', locals())
Also note that SimpleMessage.objects.all() is an extremely simple way to call the database for all objects if the SimpleMessage type. This call is quite clever and the database is not communicated with until we really need it. That means that the results of the call is not the a list of the simple message but an intermediate object. This is excellent since it is possible and rather simple to apply filters to the result of an objects.all() call, and then apply filters the that result and so on. When we finally really need the objects (for example if we iterate over them) then a query is sent to the database. That's neat! If you have ever tried to compensate bad SQL with loops in python you will know why this is so good. (A hint: writing complex and nested SQL-queries is hard but the database acts a lot faster that the bad loops you have to write in python to compensate).
In the template there are control-syntax in single curly brackets with percent and variable insertion in double curly brackets:
<html>

{% if messages %}
  {% for message in messages %}
    <p>
      <b>{{ message.sender }}</b>, {{ message.date }}<br />
      {{ message.message }}
    </p>
  {% endfor %}
{% else %}
  there are no messages yet.
{% endif %}

<a href="reply/">reply</a>

</html>
More on template syntax can be found in the django book Appendix F: Built-in Template Tags and Filters: [4]
Connect the model with the form class, add a view and a template
As we saw above we have connected the data model with a form. We just told django to not show the date field. We are now ready to look at the view and the template for the reply form.
If we were to only serve the browser with a form then the reply view could look something like the code just below: we create an instance of the form and hook the local variables together with a template and return it (as we will see it is not really that easy).
def reply(request):
    form = MessageForm()
    return render_to_response('simple_chat/reply.html', locals())
When we take a look at the form below we will see that this view is not complete. The form is quite simple; we have table and in it the form (the form by default converts itself into table rows and cells and so on - if that is not what you want you can use the as_li command for example). After the form we add a submit-button.
<html>
Form for new message:
<form action="." method="post">
  <table>{{ form }}</table>
  <input type="submit" value="Post Message" />
</form>
</html>
But where does this form submit? Aha! To itself (notice the action="." at the top). I now hope you can guess how we need to adapt the too simple view we just saw above.
Modify the View: add GET and POST
It seems to be best practice in the django world to have forms that post to "." and this means that the same view method will be responsible for serving a page for the viewer and also process the results from the method="post" of the form.
This might sound complicated and I objected to this when I first saw it "I don't want to master the dirty details of http - I just want to do python". In fact it is quite simple if you don't make it harder than in needs to be.
In short you just and an if with two branches: one that serves the browser the form (just like above), and another that processes the form. In my example the post part of the if-branch looks like this:
if request.method == "POST":
    form = MessageForm(request.POST)

    if form.is_valid():
        message = form.save()
        return HttpResponseRedirect('/chat/')
    else:
        return render_to_response('simple_chat/reply.html', locals())
As you can see there is some error-checking going on. If the form is not valid the user gets to try again. Without any css the error messages look like this:
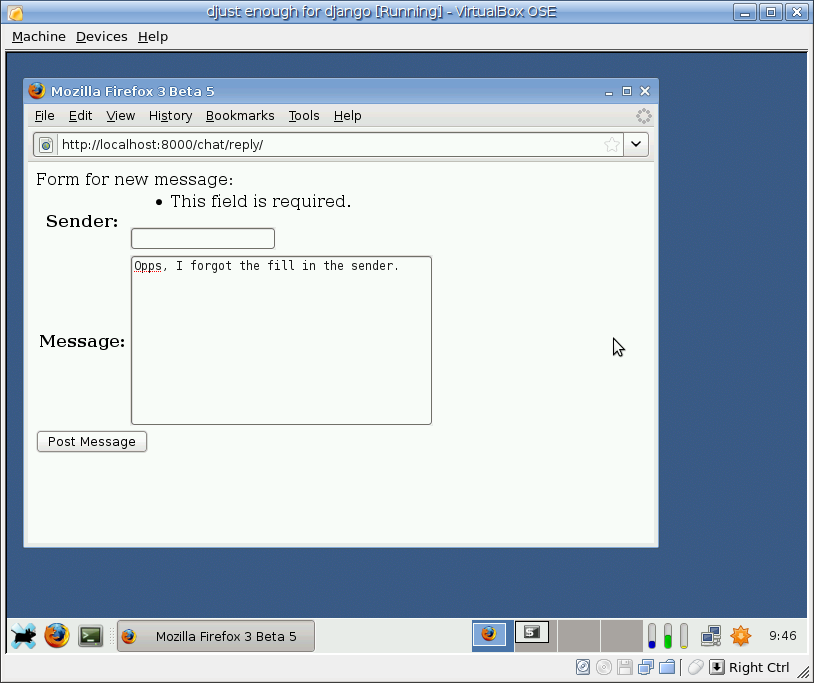
If the form is ok, then the form.save() stores it in the database.
Summary in an "All in one screen shot"
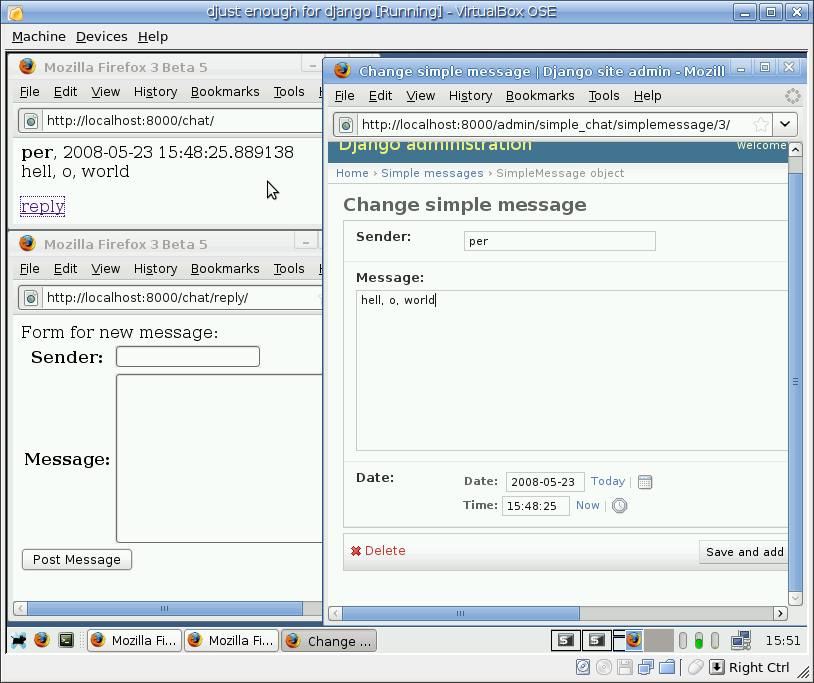
This not so pedagogical screenshot shows all aspects of where we are so far:
- The admin-interface (to the right) can be used to add entries in the database and to edit and remove them.
- The index-view (upper left) shows all entries in a way we have formatted with a link to the reply view.
- The reply view (lower left) is a form with error-handling that on save sets the date of the post to the current time.
Download
To download this django project in its entirety follow this link:
[5]
Denna sida tillhör Kategori Programmering