My First Minimal Plone Content Type
Short background
We work a lot with Plone Content Management System (see [1]) at work. Plone is a tool for building, storing and managing content via a web page. It is extremely customizable and has a huge number of add-ons. Plone is build on and "contains" Zope and Python.
Plone could easily be build to host complex software sites like SourceForge, community sites like FreeSoftwareFoundation (they use Plone already: [2]) and personal blogs.
Content types
In Plone a central concept is content type. A content type could be a news item in a newspaper, or a song on a record, or a photo in an album. Using a framework called archetypes it is quite easy building your own content types - that is what this tutorial means to demonstrate.
Please note that this is a minimalistic approach - I am sure there are more of them out there. I also use loops in at least one place where I do not need it - I'll try to explain why. This tutorial is pretty much based on the instant message example (found here [3]) by Kamon Ayeva.
The MyMessage content type
This tutorial will illustrate one way of creating a minimal content type. This is an extremely silly content type that only stores a number. As the screenshot illustrates there is also a title. (There is of course also meta data.)
A first glance at the files
My content type will be called MyMessage and it contains four files and one folder:
~/Plone-3.0/zeocluster/Products/MyMessage/
  config.py
  __init__.py
  message.py
  Extensions/Install.py
A short description:
- __init__.py contains code that pretty much registers our content type to zope.
- config.py contains global variables used in our content type. (This file could easily be removed but that not is considered best practice.)
- message.py contains the content type. In our example pretty much a schema and a short class definition.
- Extensions/Install.py contains code to making our content type known to a specific Plone instance. Unfortunately this file has to be stored in a separate folder called Extensions. This file contains about seven lines or code that could be removed but that are kept for a reason.
config.py: global variables
This is the contents of config.py:
PROJECTNAME = "MyMessage"
It only contains one line of code. Fortunately the variable PROJECTNAME is used so much that it is worth it.
(This file often also contains information important when you want to change the visual appearance when viewing your content type, or "trams" as Darth Bildt would have called it.)
__init__.py: making it known to Zope
This is the contents of __init__.py:
from Products.Archetypes.atapi import process_types, listTypes
from Products.CMFCore import utils

# Product imports
from config import PROJECTNAME

# Import the content types modules
import message

def initialize(context):
    content_types, constructors, ftis = process_types(
             listTypes(PROJECTNAME),
             PROJECTNAME)

    allTypes = zip(content_types, constructors)
    for atype, constructor in allTypes:
        kind = "%s: %s" % (PROJECTNAME, atype.portal_type)
        utils.ContentInit(kind,
                          content_types      = (atype,),
                          extra_constructors = (constructor,),
                          fti                = ftis,
                          ).initialize(context)
This file looks complicated and indeed it is. On the other hand it is quite generic - if you intend to use it you most likely only have to change the line with import message to import my_own_content_type.
It is also quite common to include custom permissions (that is outside the scope of this tutorial). If you want that see the instant message tutorial (found here [4]) by Kamon Ayeva. Since it appears to be quite common to want to have strange permission hierarchies I have left the loop at the end of this file - so that you could easily add it if you'd want to.
Extensions/Install.py: importing it in a Plone instance
This is the contents of Extensions/Install.py:
# Python imports
from StringIO import StringIO

#CMF Imports
from Products.CMFCore.utils import getToolByName

# Archetypes imports
from Products.Archetypes import listTypes
from Products.Archetypes.Extensions.utils import installTypes, install_subskin

# Products imports
from Products.MyMessage.config import PROJECTNAME

def install(self):
     """Install content types, enable the portal factory"""

     out = StringIO()

     print >> out, "Installing %s" % PROJECTNAME

     # Install types
     classes = listTypes(PROJECTNAME)
     installTypes(self, out,
                  classes,
                  PROJECTNAME)
     print >> out, "Installed types"

     # Register types with portal_factory
     # (only needed to work around the possibility that users create
     # blank instances of content types)
     factory = getToolByName(self, 'portal_factory')
     types = factory.getFactoryTypes().keys()
     if PROJECTNAME not in types:
         types.append(PROJECTNAME)
         factory.manage_setPortalFactoryTypes(listOfTypeIds = types)

     print >> out, "Added %s to portal_factory" % PROJECTNAME

     # return log-string
     return out.getvalue()
The core of this file is the below four lines. The rest might however be needed to avoid a strange bug: a user might create a new item that and it might remain as a ghost if the browsing session is aborted.
def install(self):
     out = StringIO()
     classes = listTypes(PROJECTNAME)
     installTypes(self, out, classes, PROJECTNAME)
The out variable is just a sort of a log string that stores information about the installation. The classes variable is a container variable with the types we want to install. The reason for using this intermediate way is the generic approach of this file. If you want to use this file in your project - all you need to change is: from Products.MyMessage.config import PROJECTNAME.
message.py: the content type
# Archetypes imports
from Products.Archetypes.atapi import *

# Product imports
from Products.MyMessage.config import PROJECTNAME

# Schema definition
schema = BaseSchema.copy() + Schema((
    IntegerField('body', required = 1,),
    ))

class MyMessage(BaseContent):
    """An Archetype for MyMessage application"""

    schema = schema
    _at_rename_after_creation = True

registerType(MyMessage, PROJECTNAME)
This file contains three parts of interest:
- A schema: this is the content this content-type can store. In this case extremely silly, only an integer is stored in our content type. The integer is called body and it is required.
- class MyMessage: a python class using the schema we just defined. Also the class has the flag _at_rename_after_creation set to true (meaning that the url and id of each instance of MyMessage will have a meaningful and non-random value).
- registerType(MyMessage, PROJECTNAME): the class is registered.
Minimal set of changes required
If you want to use this example and change it to fit your needs you should only have to do the following modifications:
- config.py: change the name of you project.
- __init__.py: no changes needed
- message.py: you will probably change this a lot :)
- Extensions/Install.py: the last import needs t be changed from "from Products.MyMessage.config ..." to "from Products.YourFolderName.config ..."
Use of the MyMessage content type
If you now want to add this to your Plone instance you need to create the four files above (see links below for download) and put them in something like ~/Plone-3.0/zeocluster/Products/MyMessage.
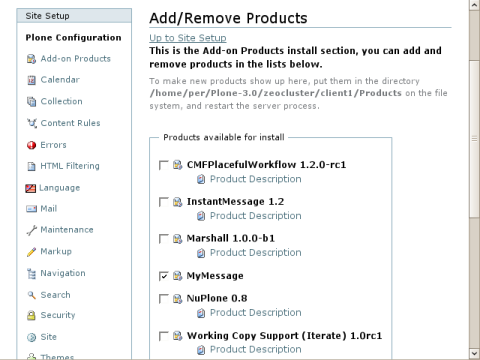
Now if you (re)start your Plone site you can install MyMessage under site setup > Add-on Products. It will look something like this:
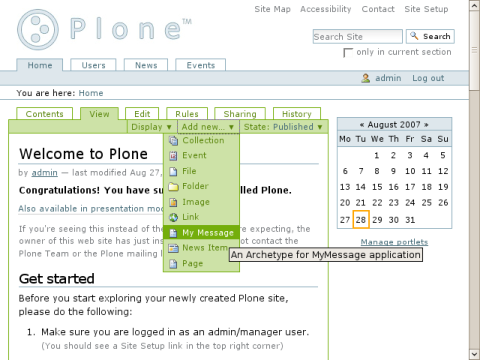
Now that the package is installed you can add an instance of type MyMessage:
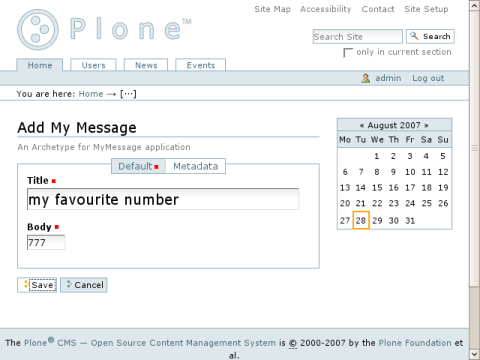
Fill in the values (if body is not an integer you are going to have to change the value):
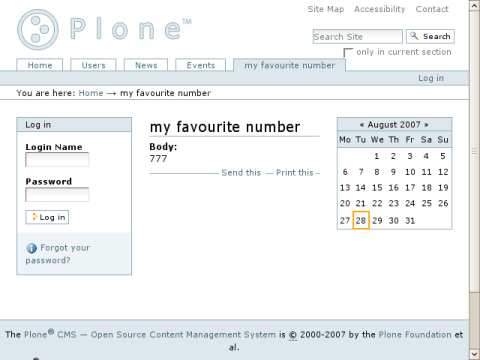
And finally, this is what a regular user would see:
Download
You can download the MyMessage content type here: [5]
This page belongs in Kategori Programmering
This page is part of a series of tutorials on Plone Cms.