Labview Loops And Arrays
I find the way Labview uses loops and arrays to be a bit confusing. I made a first attempt in my post Labview Simple For And While Loops. In this post I try to understand the feedback node and disabled indexing.
An array and a loop in C#
I find it helpful to review the concept scope to understand the differences in Labview and for example C# (see wikipedia [1]). Please note that scope is useful to understand when it comes to comprehending how variables are "copied" into sub-scopes and then "returned", but this concept does not fully explain how it works in Labview.
When coming from a text-based coding background the below code is not that complicated. The code inside the loop might be a little too much to put in one line so let's walk through.
![]()
- First we create a new array of size N2 (green).
- We run a loop with i ranging from 0 to N1 - 1.
- The array from the outside of the loop in "copied into scope" (red).
- We access the array in position i mod N2, this gives us an existing position.
- This element is incremented with one and stored in the array without us explicitly saying that (yellow).
- After the loop the array my_arr will have the values we updated.
Indexing and the feedback node in Labview
By doing the same thing in Labview we are introduced to the feedback node (see [2] at NI). The official documentation indicates that Feedback nodes transfers values from one loop iteration to the next in for loops and while loops. This means that values in an iteration in a loop is not by default passed on to the next iteration! This was for me a very useful insight.
There is a second insight needed before we go on: values coming in or out of a loop in Labview are indexed by default! This could be interpreted as something like an element is given in each iteration of the loop - similar to foreach loops in .NET (more on foreach loops at MSDN: [3]). Have a close look at the wire coming out of the loop in green in the image below: there is a pair of brackets at the exit point. Now have a look at the wire coming in and out of the second loop with the red markings: there are no brackets! Here we have disabled indexing by a right click on the exit point and selecting "Disable Indexing".
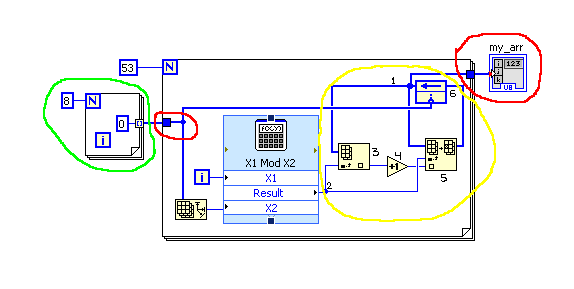
We are now ready to move on to the yellow parts where we update the array. Remember in C# where this was a oneliner: my_arr[i % N2]++;, well it's not that fast in Labview. It is more like:
  my_arr = old_arr;          // 1 get array from last iteration
  int idx = i % N2;          // 2 get the index
  int element = my_arr[idx]; // 3 get the element
  element += 1;              // 4 increment the element
  my_arr[idx] = element;     // 5 replace the old element with the new one
  old_arr = my_arr;          // 6 make sure we pass the array to the next iteration
Please see the numbers in the yellow marking for a reference to the where this happens in Labview.
In addition to this the feedback node is initialized with the array from the left and the result is passed on out into my_arr.
Shift Register
As it turns out the shift register is rather similar in how it works. It passes data in to the loop and data sent out is also sent to the next iteration, so a feedback loop is created outside of the loop. In my case this gave remarkably cleaner code. I also just discovered the Initialize Array node that can be used instead of filthy loops to generate arrays.
This page belongs in Kategori Programmering